Build your first agent
This walkthrough takes a small agent from your repository to a live, callable endpoint. We'll use a conversational "company brain" agent as the example — a single graph that answers questions about your product — but the same five steps apply to any agent you bring.
About 15 minutes · Python or TypeScript
You'll move faster if you have these ready:
- An Arai AI workspace you can create projects in.
- A GitHub repository (or a zipped bundle) containing your agent.
- An entrypoint that exposes a compiled graph named
graph.
Create a project
A project is the home for one agent across all its builds. From the console, open your workspace, choose New project, and give it a name.
Turn on Deploy from GitHub to build straight from a repository — the fastest path, and the one we'll use here. It reveals three fields, all required together:
- Repository URL — your repo's web address, e.g.
https://github.com/your-org/company-brain. Copy it from the green Code button on the repo page, or straight from your browser's address bar. - Source version — the branch, tag, or commit SHA to build from, e.g.
main. Branch and tag names live in the branch dropdown at the top-left of the repo's file list. - Personal token — a GitHub personal access token so Arai can read your repo. In GitHub: Settings → Developer settings → Personal access tokens → Fine-grained tokens → Generate new token, give it Contents: Read-only access to the repository, and paste the token here. Arai stores it encrypted in your own account's secret manager.
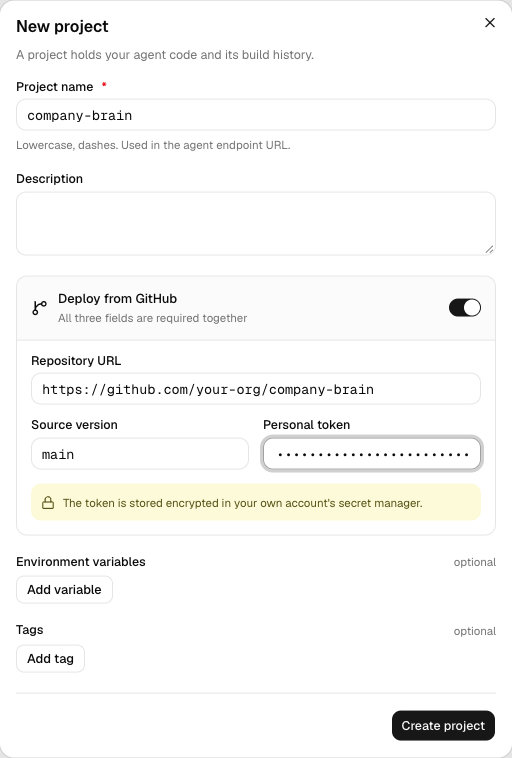
No repository handy? Leave Deploy from GitHub off and upload a zipped bundle of the same files instead — every step that follows is identical. You can also set environment variables here for any secrets your agent needs.
Each project keeps its build history, endpoint, and API key together, so you can roll back to an earlier build whenever you need to.
Point it at your code
Arai builds your agent straight from the files in your repository — there's no
Dockerfile to write and no web server to run. Two files tell Arai what to build:
a requirements.txt listing your Python dependencies, and an agentconfig.json
manifest that points at your agent.
{
"agent_entrypoint": "agent_company_brain.company_brain_agent:graph",
"extra_config_entrypoint": "agent_company_brain.company_brain_agent:get_extra_config",
"dependencies": ["requirements.txt"]
}
The manifest has three keys:
agent_entrypoint—module:variablepointing at your compiled graph. That variable (heregraph) is the one hard requirement — Arai imports it and serves it.extra_config_entrypoint(optional) — a() -> dictArai calls once at startup, for setup your graph can't express inline (for example, the semantic-search index of a long-term store).dependencies— the dependency files to install, usually justrequirements.txt.
Here is the agent those files point at — a LangChain create_agent graph
exposed as graph, plus the memory tools it calls:
import os
from langchain.agents import create_agent

from agent_company_brain.memory_tools import save_memory, search_memory


def get_llm():
  from langchain_anthropic import ChatAnthropic

  return ChatAnthropic(model=os.environ.get("AGENT_MODEL", "claude-opus-4-8"))


def get_extra_config() -> dict:
  """Called once at startup to configure the long-term store's
  semantic-search index (see agentconfig.json)."""
  from langchain_openai import OpenAIEmbeddings

  return {
      "index": {
          "embed": OpenAIEmbeddings(model="text-embedding-3-small"),
          "dims": 1536,
          "fields": ["content"],
      }
  }


TOOLS = [save_memory, search_memory]

SYSTEM_PROMPT = "You are a company-brain assistant. Answer from the company context and your memory tools."

# The entrypoint: a compiled graph named `graph`.
graph = create_agent(
  model=get_llm(),
  tools=TOOLS,
  system_prompt=SYSTEM_PROMPT,
)
The tools are plain LangChain @tool functions. save_memory and
search_memory read and write the long-term store Arai injects into your
graph at serve time — the same store whose semantic-search index you set up in
get_extra_config. The store argument is marked InjectedStore so it stays
out of the schema the model sees; Arai supplies it at run time.
You don't write a web server. Arai wraps your graph with the serving layer, a
checkpointer, and a long-term store at serve time. Keep secrets out of the repo —
set them as environment variables on the
project instead.
Run the build
Trigger a build. Arai versions and retains every build, so each one is a point you can return to. The build moves through a small set of statuses you'll see in the console:
| Status | What it means |
|---|---|
| RECEIVED | Your code was accepted and the build is queued. |
| BUILDING | The image is being built from your repository. |
| UPLOADING | The built image is being pushed to the registry. |
| UPLOADED | The image is ready to be started and served. |
| FAILED | The build stopped on an error — check the build logs. |
Start it and test in chat
Once a build reaches UPLOADED, start it to serve the agent. Open the design page to see your agent's graph and talk to it directly in the built-in chat — no integration needed yet. This is the fastest way to confirm the agent behaves before you wire it into anything.
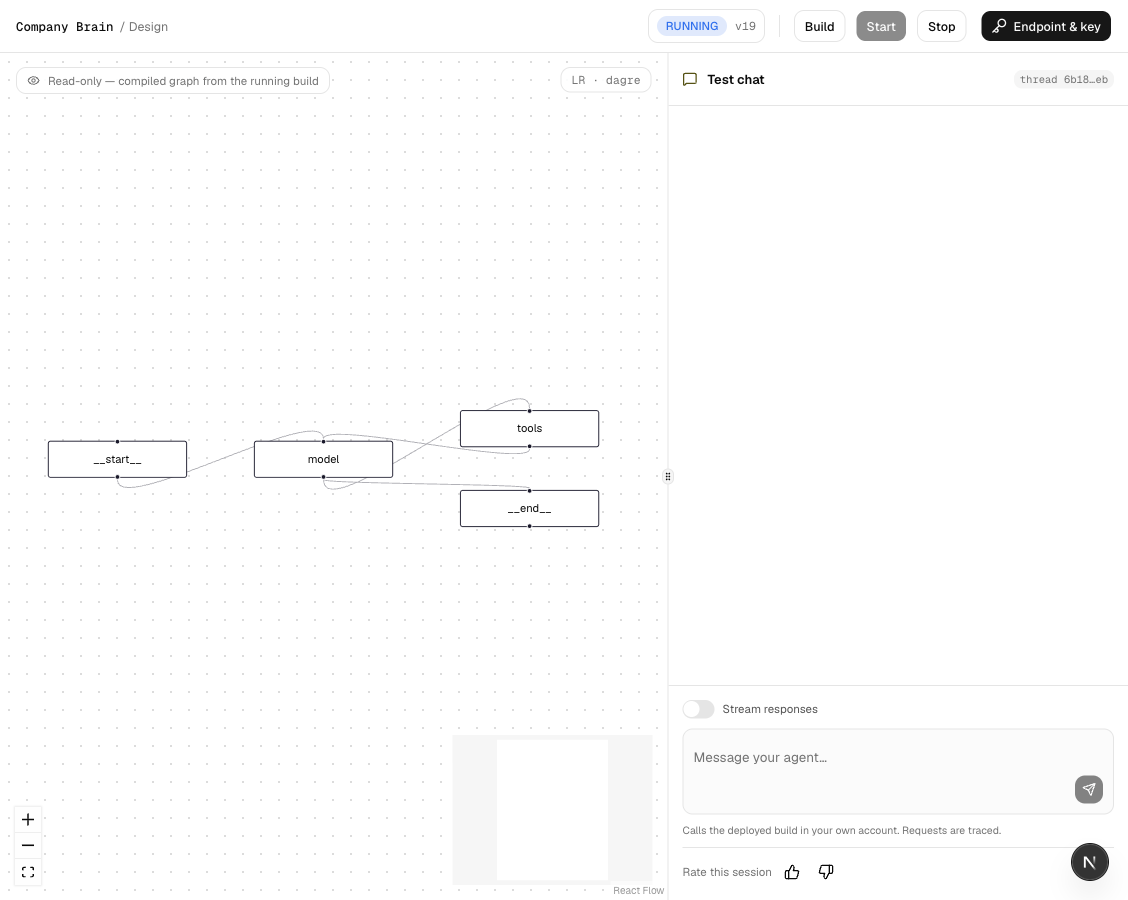
Every message you send here produces a trace, so you can inspect exactly which steps the agent took.
Call it from your own code
When you're happy with it, call the agent over its public endpoint. Open the Endpoint & API key panel from the agent's Design or Builds page to find its Invoke URL and key.
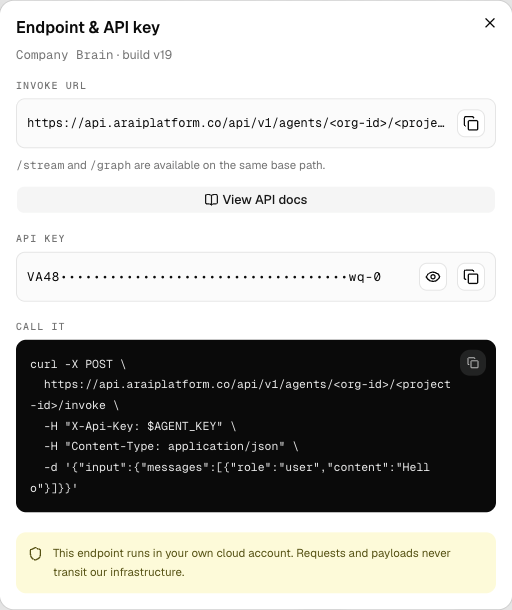
Each agent has its own base URL — …/api/v1/agents/{organization_id}/{project_id}
— and its own key. Pass the key in the X-Api-Key header and send a user_id
with every request. Post to …/sessions/{session_id}/invoke/wait to run the agent
and get its final output as one JSON response. Swap the placeholders below for the
values from the panel.
curl -X POST \
https://api.araiplatform.co/api/v1/agents/<org-id>/<project-id>/sessions/<session-id>/invoke/wait \
-H "X-Api-Key: $AGENT_KEY" \
-H "Content-Type: application/json" \
-d '{"input": {"messages": [{"role": "user", "content": "What does Arai do?"}]}, "user_id": "user-123"}'Need token-by-token output? Post the same body to …/invoke/stream for
Server-Sent Events. The View API docs button in the panel opens the agent's
own interactive reference (ReDoc) at …/redoc, listing every route.
What's next
Understand workspaces, builds, endpoints, and traces in depth.
ReadRotate keys and integrate the endpoint with your stack.
Read